Here at JangoMail, we often discuss email authentication and the records involved with authenticating your domain. Today we’re going in-depth on DKIM records. DKIM is part of the process that should be put in place to protect your company and its email sending.
What is a DKIM record?
DKIM (DomainKeys Identified Mail) is an open email authentication standard.
DKIM cryptographically signs an email message using a public and private key mechanism. The sending server encrypts a message with a private key and the receiving server can decrypt the message using the public key. This ensures that it has not been tampered with en route to the receiving server. It also verifies that the message originated from the domain it says it’s sending from.
Email messages that are signed with DKIM have a DKIM-Signature header in the email message such as the example below:
Authentication-Results: spf=pass (sender IP is XX.XXX.XXX.X)

smtp.mailfrom=jangodemo.com; dkim=pass (signature was verified)

DKIM-Signature: v=1; a=rsa-sha256; c=relaxed/relaxed; d=jangodemo.com; s=jm1;
Why is a DKIM record important for email sending?
Once you have a DKIM record set up, receiving email servers will check for its existence and authenticate your emails. This increases your email deliverability. If receiving servers see that an email fails the DKIM check, the email gets moved to the junk/spam folder or blocks the email. Failing DKIM checks typically means lack of a DKIM record, incorrect DKIM record published, or altered message body content.
Repeated DKIM failures can result in your sending IP address being blocked altogether.
DKIM records work in conjunction with other essential DNS records; JangoMail asks that customers set up an SPF record, DMARC record and a CNAME record for custom tracking domains.
How to set up a DKIM record with JangoMail
The DKIM record is a TXT record in the DNS settings for your domain. This can be added and managed wherever you host your domain’s DNS records. Examples of popular DNS providers include companies like GoDaddy, Bluehost, or Cloudflare. The DKIM record is typically set up and managed by an IT person, IT team, or the person that manages your domain.
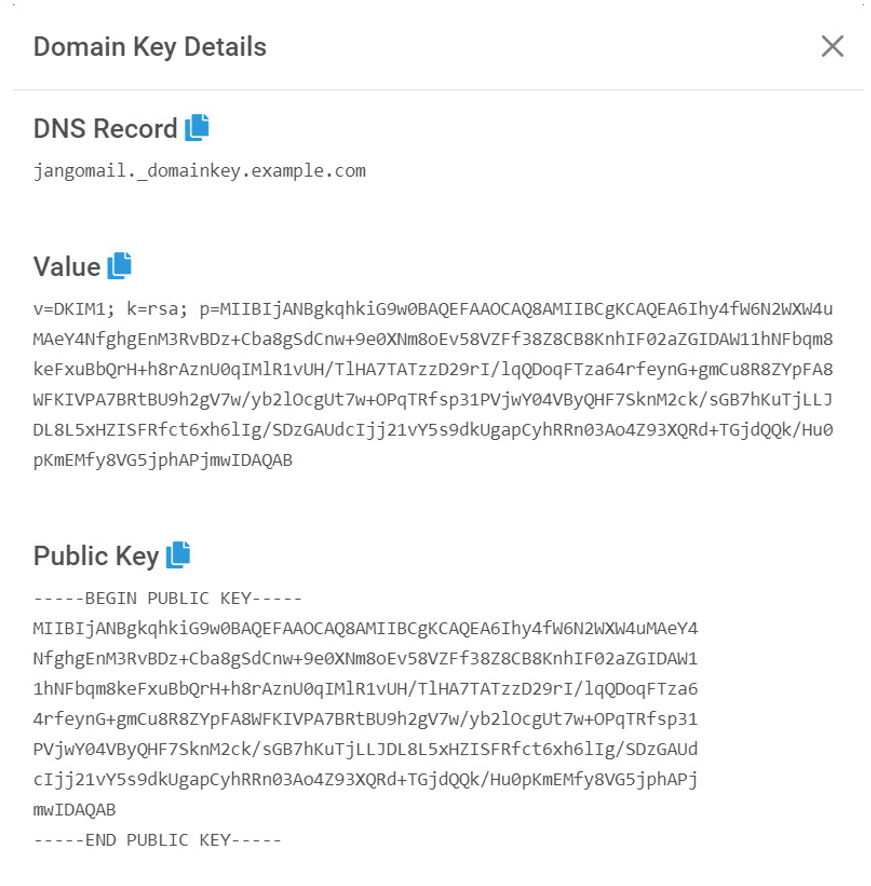
The first step is to create the DKIM record’s public key in JangoMail. Log into your account, navigate to Settings > Email Settings > DKIM. Add your domain and selector and click Create Domain Key. Click Details to copy the DNS record and the Value.
In this example, the selector is “jangomail” and the domain is “example.com”:

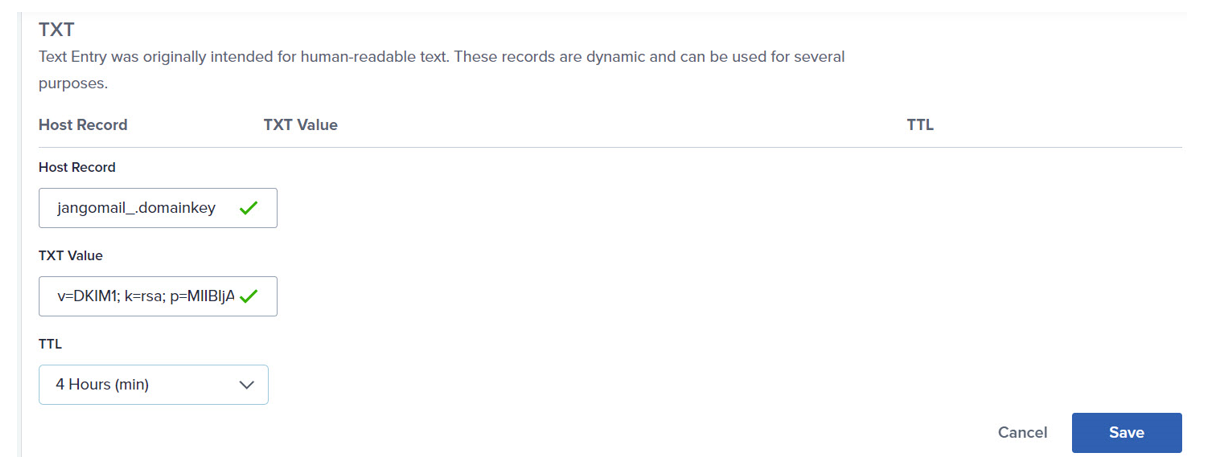
Copy the “Value” text (starting with v=DKIM1) and log into your domain’s DNS provider, and edit your DNS zone (commonly shown as Manage or Edit DNS). You will create a TXT record. DNS providers often have varying names for these, but in the example below, the DNS record copied from your JangoMail account is copied into the “Host Record” field, and the Value is copied into the “TXT Value” field.

Often, the DKIM record is published immediately and you are able to return to JangoMail and finalize the last step below. If not, it can take up to 24 hours for your DKIM record to be published.
Once your DKIM record has propagated and is visible to the internet, you will be able to complete the last step and verify the record.
For the final step, you will log into your JangoMail account, return to the DKIM settings page, and click the Enable button next to your domain. You’re all done!!
If you have an older DKIM with us, it can be upgraded to 2048 bits from 1024. DKIM checkers typically report on the length of the key, so if you want an upgrade (you should), please contact Support if you’re not sure what to do. Short answer is to create a new key in your account, and replace the old one in your DNS.
Verify your DKIM record with an online checker
A favorite tool for the JangoMail Support Team to check DKIM records is at emailstuff.org/authentication or MXtoolbox.com. There are lots of free DKIM checkers available online.
In your JangoMail account, another way to check your DKIM record is to take these 2 steps: 1) check that your domain is added to Settings > Email Settings > DKIM, and then 2) click Disable and then click Enable to verify the DNS record still exists.
Verify your DKIM record with dig or nslookup
The dig tool on Linux and nslookup on Windows are easy ways to verify that your DKIM record is set up correctly. To verify using dig, query for the TXT record at the domain where the TXT record lives. For nslookup, set type=txt and then enter the_selector._domainkey.the_domain_name.com.
dig google._domainkey.yourdomain.com TXT @ns1.yourdomain.com
To summarize
JangoMail fully supports DKIM email authentication standards.
It’s important to have DKIM set up with your own domain that you will be using as your From Address, along with an SPF record, DMARC and Custom Tracking Domain. Contact our Support Team today for a free DNS review.


